Tooling Tuesday - Bullet
Not that kind of Bullitt, that's a Steve McQueen movie
This week we take a peek at a bullet point menu system / prompt for Python.
So what is it?
Created by Brian Chao, Bullet is a Python prompt / menu creation tool for easy to navigate menus in the Python shell (REPL). We can create colourful interfaces, emojii etc.
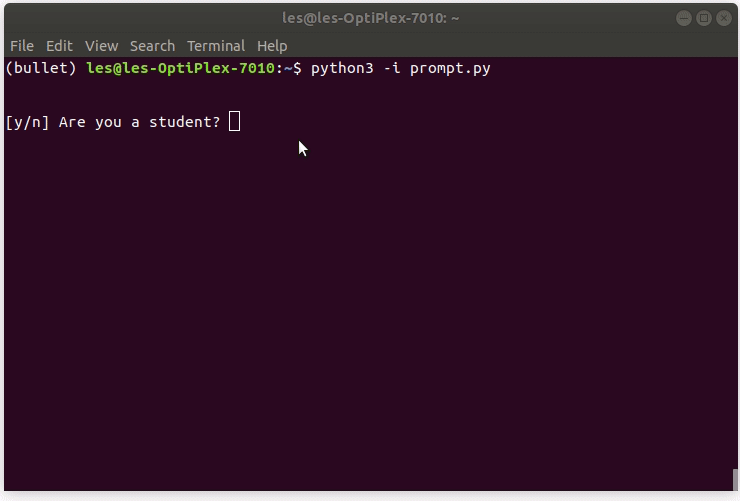
We can also create prompts that look for specific choices, i.e y/n, numbers and choices from a list. This interface means we can create an easy to use prompt for terminal / Python shell users.
So how do I install it?
Via pip of course!
On Linux open a terminal
$ sudo pip3 install bullet
On Windows open a Command Prompt (cmd.exe)
pip3.exe install bullet
So how do I use it?
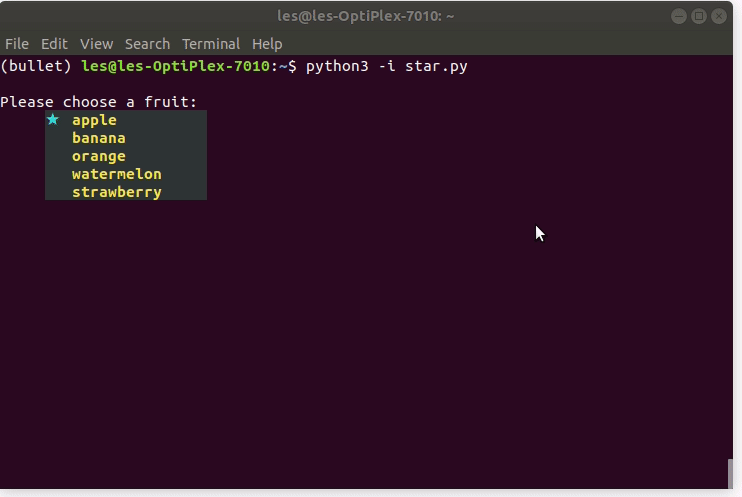
For this I shall use the star.py example which is in the examples section of the github repo.
This example creates a prompt / menu that uses a cyan coloured star to select a fruit from a list, and then print that choice out.
Here is the original example and I've added a few comments to illustrate what is going on at each stage.
We import the Bullet library
from bullet import Bullet
We import the colors class which is used to colour the prompt/menu.
from bullet import colors
We create an object called cli and in there we store the configuration of the prompt.
cli = Bullet(
First we create a message to the user, a call to action asking them to use the prompt.
prompt = "\nPlease choose a fruit: ",
Then we create a list that will store the possible choices, in this case fruits.
choices = ["apple", "banana", "orange", "watermelon", "strawberry"],
We can control the horizontal placement of the prompt using an indent or setting an alignment.
        indent = 0,
        align = 5,
The margin is the distance from the bullet to the menu item / prompt.
margin = 2,
The bullet is our tool to select an option, and it can be any character that we wish, in the example they use a star.
bullet = "★",
We can change the colour of the bullet too, here we change it to cyan.
bullet_color=colors.bright(colors.foreground["cyan"]),
When an option is highlighted, we need to show the user that, and for this we change the foreground colour. In this case a selected item is made yellow.
word_color=colors.bright(colors.foreground["yellow"]),
Unselected options are identified using a different colour, but in the star.py example they do not do that.
word_on_switch=colors.bright(colors.foreground["yellow"]),
Here we can control the background colour of our prompt, in this case anything unselected is black.
background_color=colors.background["black"],
Any item selected has another background colour, but in the star.py example they keep the same colour.
background_on_switch=colors.background["black"],
To add padding after the prompt we use pad_right, this adds just a little space to create a definite space for the prompt.
        pad_right = 5
    )
Then we come out of creating the object and create another called result which stores the output, our choice, before printing that to the Python shell.
result = cli.launch()
print("You chose:", result)
So what did I make with it?
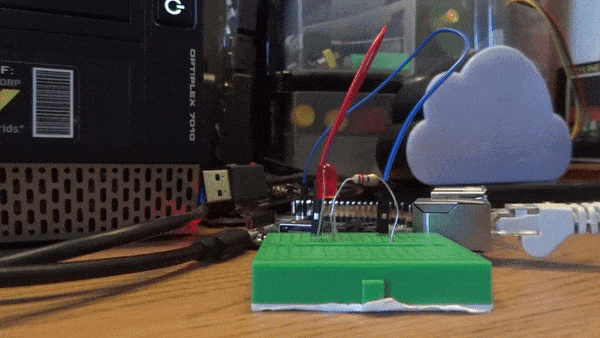
Well as a quick test I used the prompt to select one of three options to control an LED connected to pin 17 on a Raspberry Pi. To control the LED I used GPIO Zero, which is awesome!
The three options are
- Toggle, turn the LED on or off depending on the current state.
- Blink, make the LED turn on and off with a 1 second delay between each.
- Blink 4 times, it makes the LED turn on and off four times.
Here is the code.
from bullet import Bullet
from bullet import colors
from gpiozero import LED
led = LED(17)
while True:
cli = Bullet(
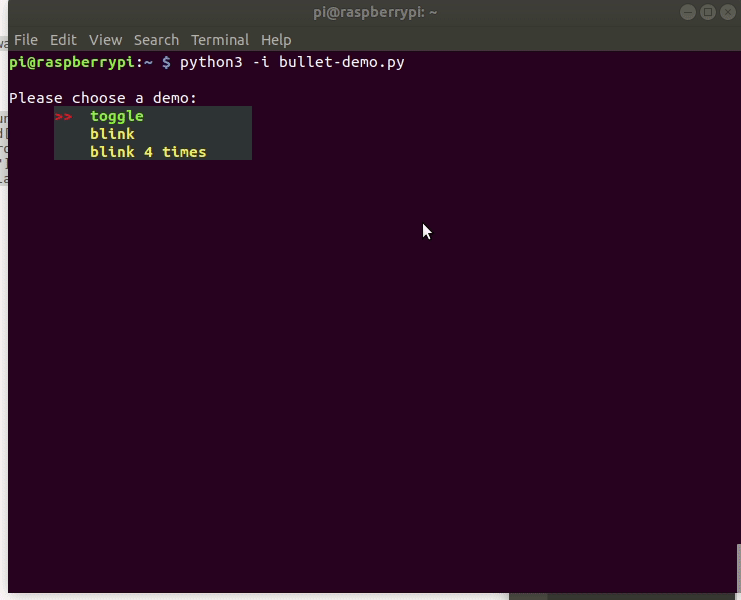
prompt = "\nPlease choose a demo: ",
choices = ["toggle", "blink", "blink 4 times"],
indent = 0,
align = 5,
margin = 2,
bullet = ">>",
bullet_color=colors.bright(colors.foreground["red"]),
word_color=colors.bright(colors.foreground["yellow"]),
word_on_switch=colors.bright(colors.foreground["green"]),
background_color=colors.background["black"],
background_on_switch=colors.background["black"],
pad_right = 5
)
result = cli.launch()
print("You chose:", result)
if result == "toggle":
led.toggle()
elif result == "blink":
led.blink()
elif result == "blink 4 times":
led.blink(on_time=0.5, off_time=0.5, n=4)
And here is what the code does on screen.
And here is what happens in real life