Santa's New HAT (Explorer HAT Fun!)
Santa always wears a funky red hat when delivering presents across the globe, but the HAT we are looking at in this post is not that. Rather it is a funky board called the Explorer HAT Pro from Pimoroni.
I LOVE this board, so much so that I wrote a lesson for Picademy, the Raspberry Pi Foundation's teacher training project, that encourages learning to hack and creative physical computing experiments using this very board.
So the other day, my good friend Damian contacted me asking for help with a Christmas project for his local Dojo.
So what can we do with an Explorer HAT, well we can flash lights....CHRISTMAS LIGHTS from Poundland!
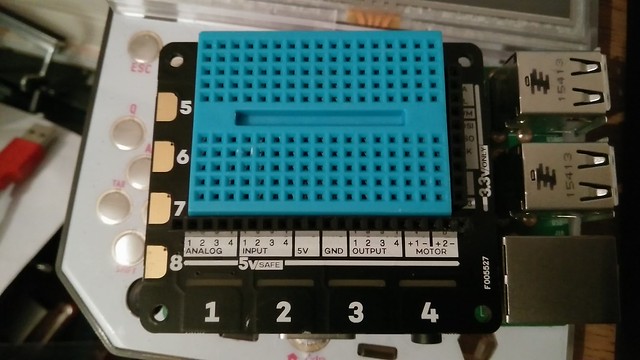
So I found a suitable light up sign...for a pound and then connected it to my Explorer HAT Pro.
The Negative (GND) wire from the lights went to OUTPUT 1 of the Explorer HAT
The Positive (3v) wire from the lights went to the 3v output of the Explorer HAT

So the goal of the project is to control the light up sign using the Explorer HAT. We shall control it in 3 ways
- Turn the lights on
- Flash the lights on and off
- Pulse the lights for a slow fade in and out
Code time!
The code for this project is written in Python and we used the Python 3 editor, found in the Programming menu. Remember to create a new file and save your work regularly!
We first import two modules, the first is the Explorerhat module, renamed to eh as explorerhat is tricky to type. The second we import the sleep function from the time module.
import explorerhat as eh
from time import sleep
Next up we create a try..except exception handler. We used this to attempt to load the code that will control our LEDs. Inside of the "try" we then create an infinite loop using "while True:"
try:
    while True:
We next turn on the lights for five seconds, we do this using the "e.output.one.on()" line. This line will connect the GND (-) of our lights to the GND of our Raspberry Pi. The other side of the lights is already attached to 3v power so by connecting to GND we complete a circuit and turn on the lights, and by sleeping for seconds we force the lights on for that duration. We also print this to the Python shell for debug purposes. We then turn off the lights before waiting for a further 1 second.
        print("Lights on")
        eh.output.one.on()
        sleep(5)
        print("Lights off")
        eh.output.one.off()
        sleep(1)
Our next section controls blinking the lights for half a second on, half a second off.
        print("Lights blink")
        eh.output.one.blink(0.5,0.5)
        sleep(5)
We then pulse the lights, pulsing has a fade in time, fade out, on time, off time. Here we used 1 second for the fade in and fade out time, and 0.5 seconds for the on and off time, but experiment to find your own combination.
        print("Lights pulse")
        eh.output.one.pulse(1,1,0.5,0.5)
        sleep(5)
Lastly we capture the exception generated by the user. In this case it is the user pressing CTRL + C on the keyboard to stop the code. This will print "Exit" to the Python shell and then turn off the output.
except KeyboardInterrupt:
	print("Exit")
	eh.output.one.off()
In operation the code looks like this.

Save your work and when ready click on the RUN >> Run Module to start the code, and you should see something similar to this.
Complete code listing
import explorerhat as eh
from time import sleep

try:
    while True:
        print("Lights on")
        eh.output.one.on()
        sleep(5)
        print("Lights off")
        eh.output.one.off()
        sleep(1)
        print("Lights blink")
        eh.output.one.blink(0.5,0.5)
        sleep(5)
        print("Lights pulse")
        eh.output.one.pulse(1,1,0.5,0.5)
        sleep(5)
except KeyboardInterrupt:
	print("Exit")
	eh.output.one.off()
You can also download a ZIP archive containing all of the code from my Github repository.